The Magic of Collaborative Bookmaking
Many parents dream of co-authoring a book with their children, but the process of writing, illustrating, and organizing pages can feel overwhelming. Today, tools like TaleHug make it possible to write a children's book with ai by turning a collaborative brainstorming session into a structured, illustrated, physical-feeling digital draft in minutes.
Co-authoring a book with your child is more than a creative exercise; it is an active parenting opportunity. It invites you to step into your child's imaginative world, validating their ideas while teaching them structured language habits. In this tutorial, we will walk you through a practical, step-by-step workflow to translate a child's raw inspiration into a polished, safe, and beautiful picture book.
Step 1: Catch the Spark (Voice and Drawings)
Children are natural-born storytellers, but they rarely express their narratives in neat, chronological text. If you sit a child down with a blank sheet of paper and ask them to write a story, they may experience creative block. Instead, capture their ideas during moments of play or conversation:
- Capture Voice Ideas: When your child starts describing a fantasy character (like a tiny space rabbit) or a funny event, use a voice recorder. TaleHug features a built-in voice input tool that transcribes voice ideas. It automatically filters out pauses and filler words, capturing the raw storyline in plain text.
- Digitize Crayon Drawings: If your child draws a sketch of a star, a house, or an animal, snap a photo of it. TaleHug supports image-to-image inputs. When you upload a child's drawing, the AI model uses it as a layout anchor. It preserves the color scheme and general shapes, upgrading the crayon scribble into a professional storybook illustration.
By treating a child's natural drawings and spoken words as the "story seeds," you build their confidence and show them that their voice has real creative power.
Step 2: Establish the Storyboard Outline
Once you have the core concept, you need to structure it. A successful picture book for preschool and kindergarten readers works best when it is short and follows a predictable narrative rhythm. We recommend planning a storybook of 4 to 10 pages, where each page represents a single, clear visual action.
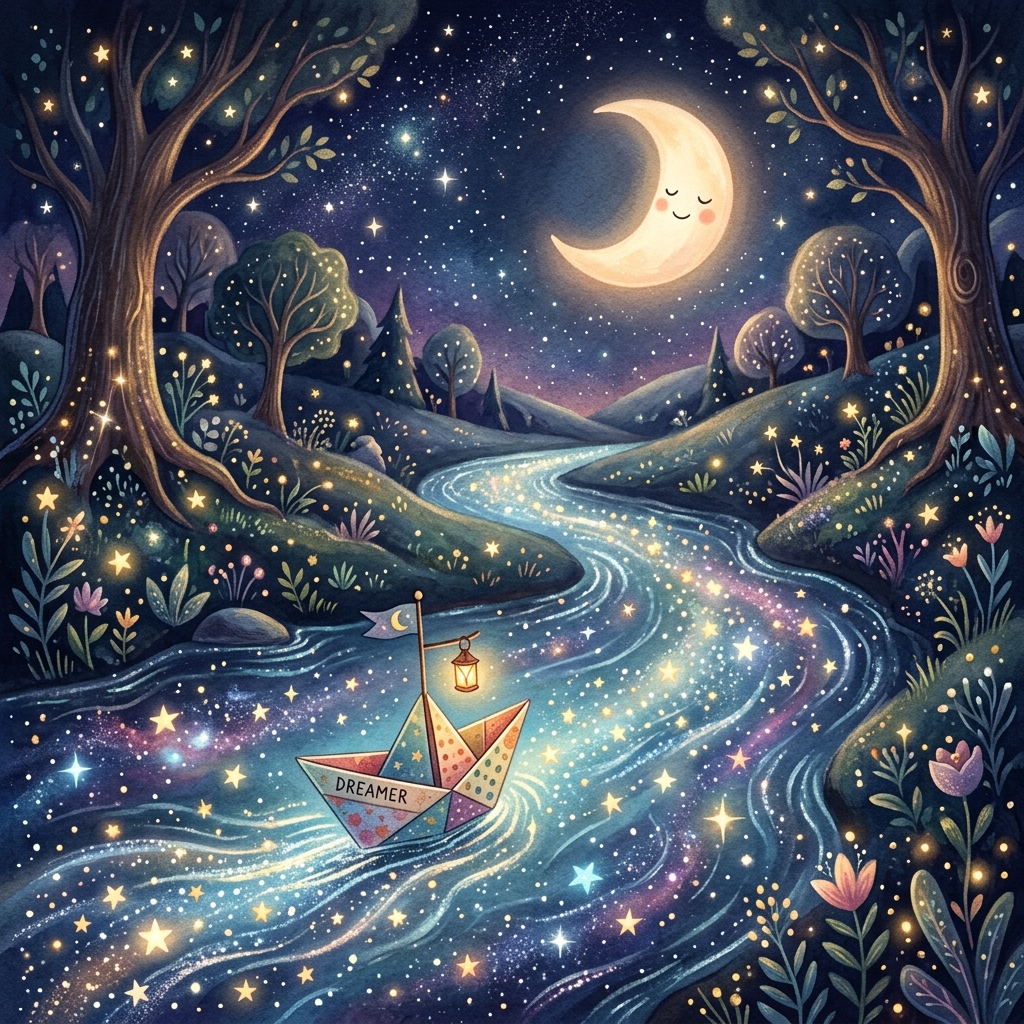
For example, if you are writing a story about a paper boat named Dreamer:
- Page 1 (The Beginning): Introduce the character and the setting.
- Text: "Dreamer was a little paper boat who lived in a garden puddle."
- Page 2 (The Conflict): A small event changes the routine.
- Text: "A heavy rain fell, and the puddle turned into a fast-moving stream."
- Page 3 (The Journey): The character travels and meets a helper.
- Text: "A friendly green frog hopped along and guided Dreamer past a sharp rock."
- Page 4 (The Climax/Transition): The journey reaches its most beautiful or exciting moment.
- Text: "Night fell, and Dreamer floated down a magical river under a sky full of glowing stars."
- Page 5 (The Resolution): The story ends with a calm, reassuring conclusion.
- Text: "Finally, the stream slowed down, and Dreamer docked safely next to a cozy patch of soft grass."
This simple 5-page storyboard provides a clear narrative arc (Beginning, Middle, Climax, and Ending) that is easy for a child to follow.
Step 3: Write Visual Prompts for the Generator
When you write a children's book with ai, you need to think like an illustrator. General-purpose language models understand abstract feelings, but image models need concrete physical descriptions. Avoid using abstract adjectives and focus on visual nouns and actions:
- Abstract (Avoid): "Dreamer feels lonely and sad on the wide river." (This is hard for an image model to draw, as "lonely" and "sad" are internal feelings).
- Visual (Prefer): "A small colorful paper boat floating alone on a wide, calm, moonlit river. The sky is dark blue and full of soft glowing stars. Watercolor art style, warm cozy lighting."
Let us compare how writing visual descriptions changes the quality of your generations:
| Abstract / Poor Prompt | Descriptive / Excellent Prompt |
|---|---|
| A rabbit is happy. | A fluffy white bunny wearing a tiny blue scarf hopping in a green grassy meadow under bright morning sunlight, soft watercolor illustration style. |
| The toy rocket goes to space. | A small red toy wooden rocket ship floating past a smiling yellow crescent moon in a deep purple sky filled with twinkling stars, claymorphism art style. |
| A forest with animals. | A cozy hollow inside a giant oak tree where a baby squirrel and a sleeping hedgehog are sitting on soft green moss, pastel fairytale watercolor. |
Step 4: Achieving Character Consistency
One of the greatest challenges when you write a children's book with ai is ensuring that your main character looks the same on every single page. Because diffusion models generate images from scratch each time, they can easily change a character's clothing, colors, or species. To prevent this, use the following consistency tactics:
- Specify Unique Accessories: Give your character a highly specific, static accessory. For example, instead of "a dog," write "a brown puppy wearing a bright red collar with a golden tag." The model will lock onto the collar across pages.
- Keep Style Identifiers Identical: Never change your art style tokens. If Page 1 uses "soft watercolor illustration style," Page 2, 3, and 4 must use that exact same phrasing. If you swap to "oil painting" or "3D render," consistency will break instantly.
- Coordinate Color Palettes: Keep your colors locked. Describe your character using primary colors: "a little grey squirrel with an orange tail." Repeating these specific colors helps the neural network bind them to the character shape consistently.
Step 5: Edit, Polish, and Share Safely
After generating the pages, review the draft in your dashboard. The creator tool displays the storybook in a clean grid, allowing you to edit the text lines, regenerate specific page illustrations that did not match your prompt, or drag pages to reorder them.
TaleHug is private-by-default, meaning your drafts stay secure in your account. When you are happy with the draft, you can:
- Share with your Circle: Send a private, secure link to grandparents, close friends, or classmates. They can read and like the book without it being publicly indexed.
- Submit to Public Gallery: If you want other young creators to read your book, submit it to the Public Gallery. It will go through the moderation queue to ensure it contains no real-world names, locations, or sensitive content before publication.